
When toddlers ask “why?” answer with STEM activities
“Why are you going to the grocery store? Why is this tree bigger than that tree? Why do I have to brush my teeth?”
As kids grow, their vocabulary expands to include the whats, hows, and wheres. “What’s in that nest? How do planes fly? Where does the sun go at night?”
Not only is this a common occurrence, it’s also a very healthy one. When kids ask questions, they’re curious, they want to know how the world works, and they’re developing their critical thinking. Curiosity breeds creativity, exploration, experimentation, and reasoning.
Sometimes you don’t have the answers. I mean, I have no idea where frogs go in the winter. How many bones DO I have in my hand?
As parents and caregivers, we have a superpower: we can encourage and support our kids to keep asking questions. And we can help guide our kids to learn how to solve problems and to spark their curiosity and creativity with some fun outdoor STEM activities.
What are STEM activities and why are they important?
STEM is the acronym for Science, Technology, Engineering and Math. Sometimes they’re studied separately, but often they’re looked at together because they’re interconnected: scientific discoveries drive new technologies, new technologies advance engineering, and all three rely on mathematics as a common foundation.
STEM activities help your kids with problem solving, foster innovation, and encourage creative thinking, observation, and curiosity.
STEM education doesn’t need to take place in classrooms. Head to the great outdoors with your toddlers, preschoolers, and kids of all ages to get some hands-on STEM fun!
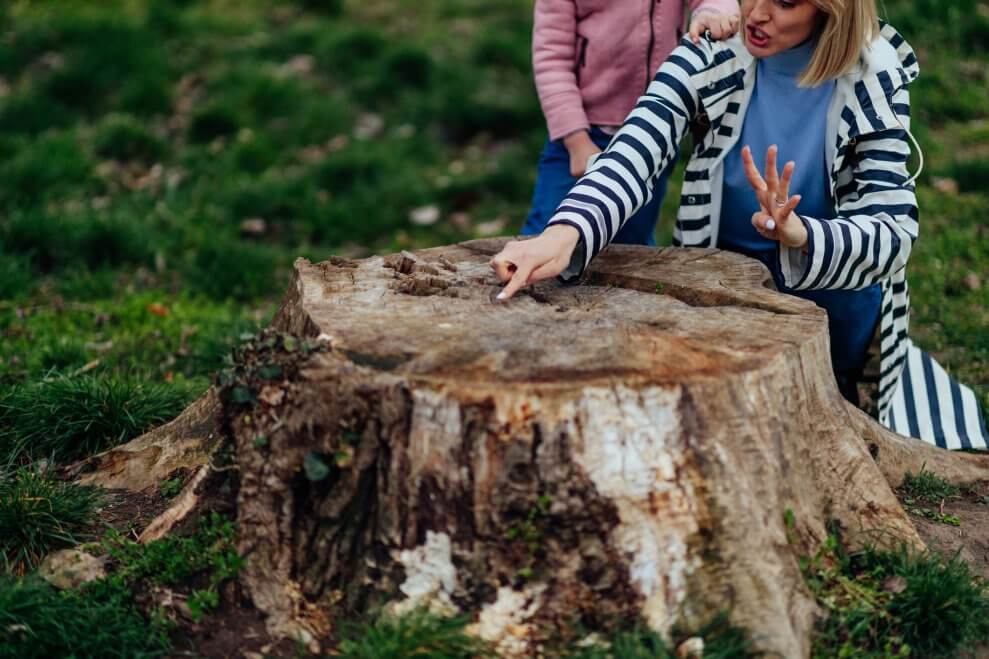
1. Secrets of the Stump
Dendrochronology is the scientific name for the super interesting examination of tree stumps. Your child will learn about nature and ecology while analyzing their rings.
Head to your yard, a park, or a wooded area to find a stump. Bring a magnifying glass and a notebook to jot down your kids’ observations.
The rings of a stump reveal so many secrets. You might already know that counting the rings reveals the tree’s age. But the rings tell you so much more. If they’re far apart, it means that the tree was healthy with plenty of sunlight and good soil. If they’re closer together, the tree grew in worse conditions.
2. Water Targets
Your kids will learn about force and velocity with this fun and splashy game!
Line up items, such as empty containers, bath toys, or sand pails, and see if your child can knock them over with the water from a hose. To give the water extra speed and force, have them place their finger or thumb over the opening of the hose. How much more quickly do the items fall down when they have their fingers on the hose opening?
3. Slide Speed Showdown
Kids will love this game that’ll have them learning about force and motion.
Have them collect items from around your home, some of which are flat (such as bath books, beanbags, or pieces of Lego), some round (such as tennis or golf balls), and items with wheels (such as toy cars or trucks).
Have your child stand at the top of a slide and place two different items on it. Which item do they predict will get to the bottom the fastest? Have them switch up the items each time. Is a round object going more quickly? A lighter or heavier one? Soon they’ll be mixing items and using their observations to determine what will happen.
4. If/Then Coding Game
It’s possible for your kids to learn about technology without using a computer, tablet, or phone. The concept of “if one condition is met, then something else can happen” is a great activity for understanding coding.
Have one child be the programmer and the other(s) the computer. The programmer will call out an if/then command and the computers must follow. Commands could include, “If I touch my nose, then you must jump on one foot” or “If I wave my hand, then you must dance like a monkey.”
5. Pattern Dance
When you teach kids about patterns, they’re learning a fundamental skill of mathematics.
There are many ways for kids of different ages to work on their patterning skills, from laying out blocks in a sequence of red, green, red, green, to placing shapes in an order of circle, circle, square, circle, circle, square.
A fun way to get your kids moving and patterning is by performing some peppy and repetitive dance moves. Start without music and work on some moves such as step to the left, step to the left, step to the left, and jump. Step to the right, step to the right, step to the right, and jump.
6. Bouncing Bubbles!
This is such a fun way for your kids to see that combining different items can create unique and cool outcomes. The trick behind this bubble solution is using sugar (not used in regular solution) and wearing a glove when bouncing the bubbles.
Your kids will be blown away (pardon the horrible pun) when they see that they can create a bubble they can bounce on their hands instead of one that pops immediately. Get busy in your kitchen to make this concoction:
7. Launch Lab!
Your kids can learn all about physics and mechanics without leaving their own backyard (or park or other outdoor space!) Build a simple catapult using a piece of wood (the lever), a block of wood (the fulcrum), and a bean bag or small toy (the projectile).
Use one plank of wood about three or four feet long and nail or screw a block of wood near the end of the plank. Place a beanbag or small toy at the end of the plank and have your child jump on the other end. How high can the beanbag fly? Can it fly higher the harder your child jumps on the wood?
You can leave the block of wood loose and move it to different spots under the plank to see how it changes the distance the bean bag flies. Check out this preschooler having fun with his catapult.
8. The Great Mud Bake-Off
Making the perfect mud pie uses all kinds of STEM skills, including measuring, estimating, ratios, observing, states of matter, building, shaping, design, etc. And what kid doesn’t love digging in squishy, oozy mud?
Provide your child with buckets of water, cups, or other containers for pouring the water; bowls or pails to mix in; spoons or sticks for mixing; old muffin or pie tins for forming the pies; and nature items such as leaves, pebbles, or pine cones for decorating.
Let your child dig and shovel dirt into a bowl and have them “bake” the most yummy pie by mixing in just the right amount of water. Their pies can be patted together by hand and placed on the ground or poured into tins. Do they like a softer pie or a harder one?
How much water does it take to make the perfect mud mixture?

9. Robot Treasure Hunt
There are many ways for your kids to learn about algorithms without using a screen. Algorithms are sets of steps or instructions that are used in order to complete a task. Programmers use algorithms to have computers perform calculations and process data.
We use algorithms every day when we take steps to make dinner, get to school, or dress ourselves. Set up a treasure hunt with your “robots” (kids) in your backyard or a nearby park and have them follow an algorithm (also known as a set of instructions) to reach a goal.
Pick one kid to be the programmer. Based on the age of your kids, the programmer can set up the course and the instructions by themselves. If they’re younger, you can set up the instructions and have the programmer read them out.
Hide a “treasure” in a spot such as behind a tree, under a chair, or under a rock and let the hunt begin.
Have your robots line up at a start line to receive their instructions. The programmer will then give them their commands. Instructions could include “Take three steps to the right” or “Turn left” or “Move forward five steps.” The instructions should take the robots right to the treasure!
10. Lava Sand Land
Your kids will learn about what happens when different substances are added to each other (chemical reactions!). Perform the experiment several times using different amounts of each substance so your kids can predict what the outcomes will be each time.
Use a small container such as an empty yogurt tub, cup, or bottle and place it in a sandbox. Build a mound of sand around the container, making sure that you can pour items into the opening.
Pour a tablespoon of baking soda and a few drops of food colouring into the container along with a squirt of dishwashing liquid. (This will make it foamy). Have your child pour vinegar into the container and let the “lava” flow!
As the bubbling slows down, add more vinegar and baking soda. (You can stir up the baking soda from the bottom of the cup too.) What will happen if you add more baking soda and less vinegar? Or the other way around?
11. Wind Patrol
Your child has no doubt seen tree branches swaying in the wind. Do they know which way the wind is blowing? Stoke your little meteorologist’s mind and work with them to build a wind vane.
You’ll only need a pencil with an eraser, a piece of cardboard, a small piece of paper, a pushpin, and a wad of playdough or clay. Make the wind vane together and have your child observe the sky while watching the vane.
Are there clouds in the sky? Are they moving? Which way is the wind blowing? (The tip of the vane shows where the wind is coming from.) Your child could keep a record of which way the wind blows every day for a week or more.
12. The Dandelion Dip
Nature is amazing and full of surprises! When dandelions go to seed (when they’re white and puffy), the seeds blow away easily. But those dandelion heads (also known as dandelion clocks) are actually more resilient than you might think!
Ask your child what they think will happen when they dip a dandelion head into a cup of water? Will the seeds sink to the bottom? Will the puffy head get soaked like a cotton ball?
Find several dandelions that have gone to seed and one at a time, have your child put them puffy-side down in a cup of water. Keep the dandelion still and after a few seconds pull it back out.
Spoiler alert: when your child pulls the dandelion back out, the seeds will still be in place. Why? Dandelion seeds are water-resistant, so they won’t break away from the head of the flower. Mind blown!

13. Set Sail with Sticks
When your kids build and sail stick rafts, they’ll learn about engineering basics, such as flotation and structural design.
Go for a stick hunt and have your child find a number of sticks. Snap them so they’re the same size as each other. (The sticks can be any length as long as they’re the same size.)
Lie the sticks beside each other vertically and tie them into a raft using twine or string. You might have to bind a few together before you tie them all into one raft. Use another stick to tie across the top and one across the bottom. You can attach a paper sail or a sail made of leaves or use the raft as is.
Now comes the fun part! Have your child see if the raft floats in a kiddie pool or other container of water. If it doesn’t, should they take off one stick? Add another? And when it does float, is it strong enough to hold a small toy? Will it float with a heavier object?
See how these Boy Scouts made their raft:
14. The Great Bug Hunt
Connect with the great outdoors and your kids can become entomologists—a.k.a. bug scientists! You and your child can read about bugs with some great books about types of bugs and insects and how to find them.
You’ll find out some cool facts together about bugs that kids will love, such as the fact that mosquitoes are attracted to smelly feet and that grasshoppers have ears on their bellies.
Set out with your kids to find bugs but first, have a conversation with them about all the different places where they might find bugs or insects. Ask for their ideas. Will they find some on plants? Under rocks? On top of rocks or logs? In the dirt?
Take along a magnifying glass, binoculars, and shovels to dig into dirt. You might also want to bring a book for your kids to draw pictures of the bugs or insects that they find or a camera to document their finds.
See if your child can find ones with legs, shells, wings, or antennae. If your child lays down their hands beside a bug or insect, see if it will crawl on to them.
15. Operation: Measure It
Honing your kid’s measuring skills will teach them the concepts of shorter, taller, bigger, smaller, wider, estimation, distance, and spatial relationships. And they can practice measuring with some fun outdoor activities!
- Collect a number of sticks and have your child line them up in order of longest to shortest.
- Using a stuffie, have them measure the width of a log. Is it three stuffies wide? Four?
- Have your kids lie on the ground next to each other with their feet at the same point. Trace their bodies with sidewalk chalk then have them look to see which of them is taller.
- Set up a long jump on the grass or in sand. From a starting point, have your kids jump forwards. Show them how to use a measuring tape to see how far they went. Can they go farther the next time?
- Have your kids estimate how much string they’ll need to wrap around a tree. Measure and see!
16. Slime Time
I love playing with slime! Umm… I mean my kids love playing with it.
Who knew that slime-making is a great way to learn about science and math? Mixing up different ingredients and seeing how they work together is not just interesting but it makes for great playtime.
There are so many ways to make slime and your kids will use their skills of problem solving. Will adding extra of one ingredient make it stickier? Could it be more stretchy? How could I make it just the way I like it? Make slime outdoors in your sandbox with only three ingredients:
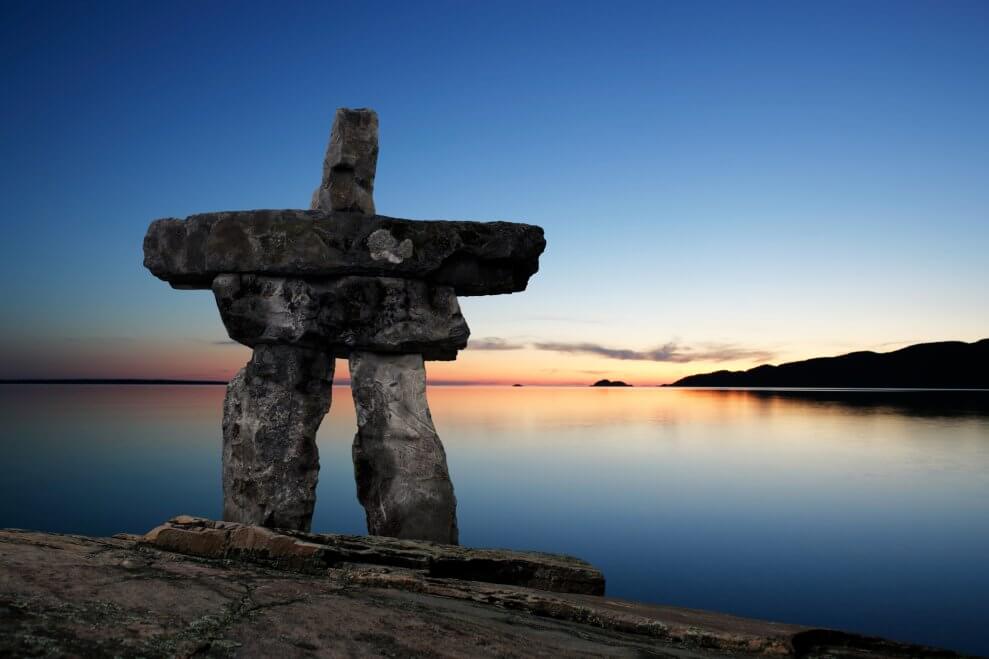
17. Build an Inuksuk
By building inuksuks, kids will learn about structural engineering and geology. Inuksuks have been built for thousands of years, mainly by Inuit in the Arctic. They’re stone landmarks used for communication, as navigational aids, and sometimes as spiritual figures.
Before your child starts building an inuksuk, read some great kids’ books (like this one or this one) together to learn about Inuit culture.
Then go on a rock hunt and gather rocks of various sizes. Make sure they have flat surfaces for easy building. Have your child stack the rocks in any design that they like by balancing the rocks to ensure they stay standing. They can be as tiny or as large as your kids want.
18. Nature Suncatcher
Making a suncatcher with pieces of nature is a great STEM activity. Your kids will learn about nature, translucency (what items can the sun go through), design, patterning and problem solving.
Find nature items around your yard or neighbourhood such as petals, leaves, flowers, or twigs. Take a paper plate and cut out the centre. Stick a square of contact or adhesive paper over the cut-out spot and have your child place their nature pieces on it.
How will they make their design? Will they put similar colours or items together? Can they fit all the pieces on the suncatcher? Attach a piece of string to the top and hang it for all to see!
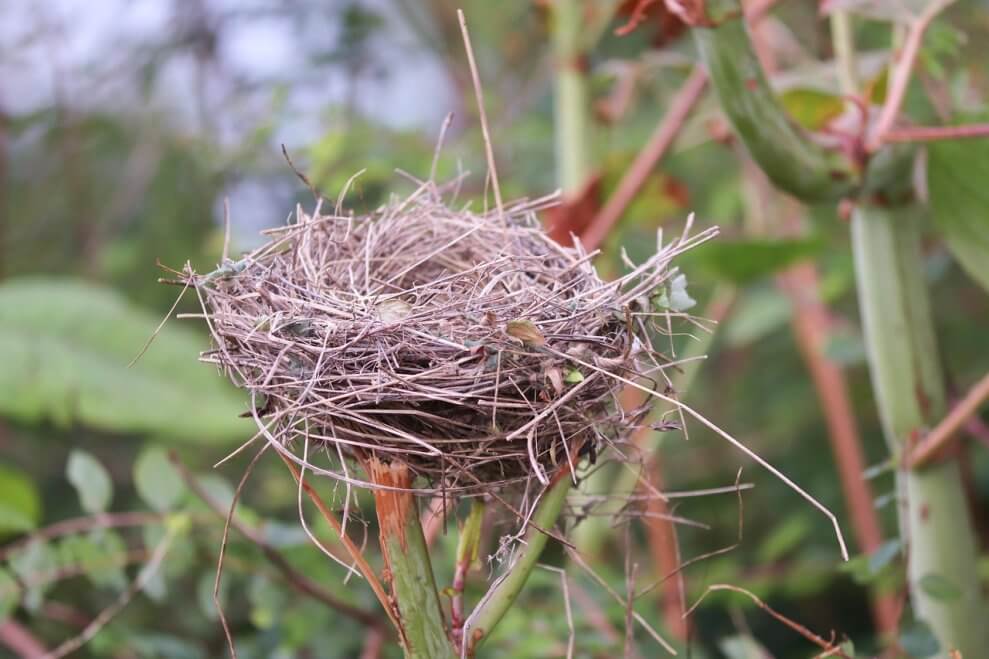
19. Home Tweet Home
Your child will be an engineering hero when they design a cozy nest for the birds in their neighbourhood.
Gather materials from nature such as leaves, twigs, pine cones, moss, feathers, vines, grass, hay, straw, and mud. Use vines or natural, untreated jute string (safe for birds) to weave the pieces of the nest together or simply intertwine the twigs, the grass, and other materials.
Another way to form the nest is to have your child use a bowl to shape together a mud form as a base. Or they can use another base, such as a slice of wood, moss, or even an untreated coconut liner that you might use for a hanging basket.
20. Crayon Cookies, Anyone?
Your kids will learn about changes from solid to liquid using solar power while having a colourfully great time! You’ll need an old metal cookie sheet, broken pieces of crayon, and cookie cutters.
On a hot, sunny day, have your kids put cookie cutters on the cookie sheet and place crayon pieces into the cookie cutters. Have them use the same colour or different colours in each of the cutters.
When the crayons have fully melted in the cutters, take the tray inside using oven mitts (the tray will be hot!) and place it in a fridge or freezer. When the “cookies” are solid, pop them out and voilà! Your kids will have baked up a whole new fun-shaped crayon to use.
While the crayons are in the sun, ask your kids to estimate how long it will take for the crayons to melt. What new colours will emerge when using different colours of crayons together?


Very insightful.
I will practice the new tips I am just getting to know